
ViewState XSS: What’s the Deal?
Filed under: Development, Security, Testing
Many of my posts have discussed some of the protections that ASP.Net provides by default. For example, Event Validation, ViewStateMac, and ViewStateUserKey. So what happens when we are not using these protections? Each of these have a different effect on what is possible from an attacker’s stand point so it is important to understand what these features do for us. Many of these are covered in prior posts. I often get asked the question “What can happen if the ViewState is not properly protected?â€Â This can be a difficult question because it depends on how it is not protected, and also how it is used. One thing that can possibly be exploited is Cross-site Scripting (XSS). This post will not dive into what XSS is, as there are many other resources that do that. Instead, I will show how an attacker could take advantage of reflective XSS by using unprotected ViewState.
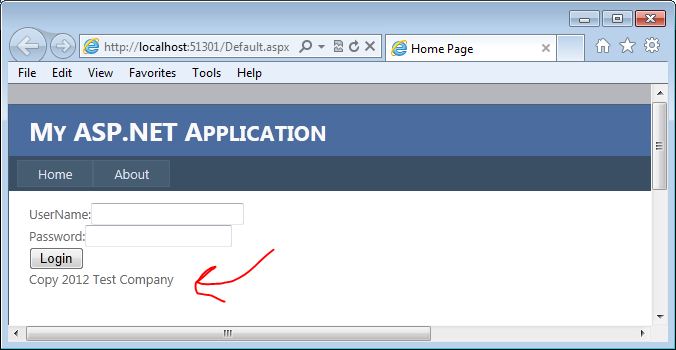
For this example, I am going to use the most basic of login forms. The form doesn’t even actually work, but it is functional enough to demonstrate how this vulnerability could be exploited. The form contains a user name and password textboxes, a login button, and an asp.net label control that displays copyright information. Although probably not very obvious, our attack vector here is going to be the copyright label.
Why the Label?
You may be wondering why we are going after the label here. The biggest reason is that the developers have probably overlooked output encoding on what would normally be pretty static text. Copyrights do not change that often, and they are usually loaded in the initial page load. All post-backs will then just re-populate the data from the ViewState. That is our entry. Here is a quick look at what the page code looks like:
1: <asp:Content ID="BodyContent" runat="server" ContentPlaceHolderID="MainContent">
2: <span>UserName:</span><asp:TextBox ID="txtUserName" runat="server" />
3: <br />
4: <span>Password:</span><asp:TextBox ID="txtPassword" runat="server" TextMode="Password" />
5: <br />
6: <asp:Button ID="cmdSubmit" runat="server" Text="Login" /><br />
7: <asp:Label ID="lblCopy" runat="server" />
8: </asp:Content>
We can see on line 7 that we have the label control for the copyright data.  Here is the code behind for the page:
1: protected void Page_Load(object sender, EventArgs e)
2: {
3: if (!Page.IsPostBack)
4: {
5: lblCopy.Text = "Copy 2012 Test Company";
6: }
7: }
Here you can see that only on initial page load, we set the copy text. On Postback, this value is set from the ViewState.
The Attack
Now that we have an idea of what the code looks like, lets take a look at how we can take advantage of this. Keep in mind there are many factors that go into this working so it will not work on all systems.
I am going to use Fiddler to do the attack for this example. In most of my posts, I usually use Burp Suite, but there is a cool ViewState Decoder that is available for Fiddler that I want to use here. The following screen shows the login form on the initial load:
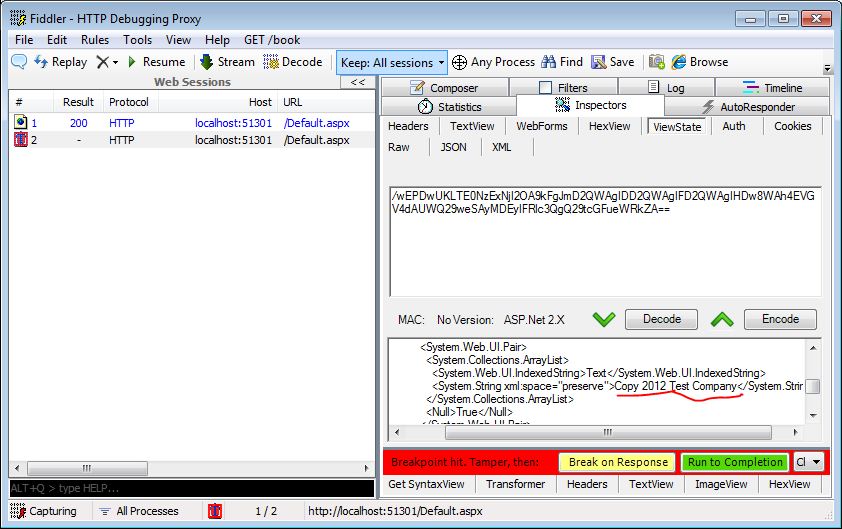
I will set up Fiddler to break before requests so I can intercept the traffic. When I click the login button, fiddler will intercept the request and wait for me to fiddle with the traffic. The next screen shows the traffic intercepted. Note that I have underlined the copy text in the view state decoder. This is where we are going to make our change.
The attack will load in a simple alert box to demonstrate the presence of XSS. To load this in the ViewState Decoder’s XML format, I am going to encode the attack using HTML Entities. I used the encoder at http://ha.ckers.org/xss.html to perform the encoding. The following screen shows the data encoded in the encoder:
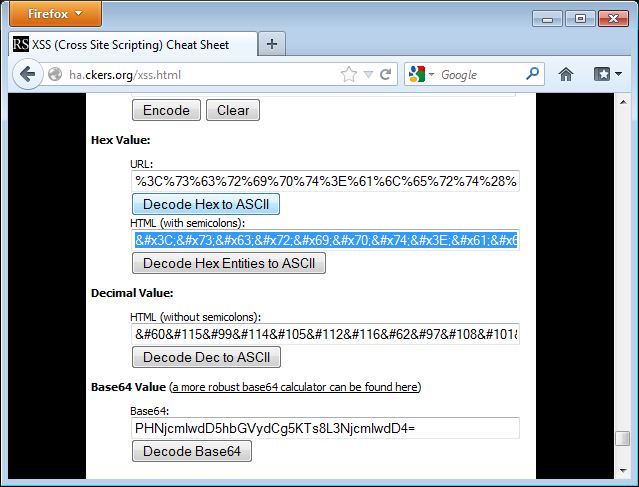
I need to copy this text from the encoder and paste it into the copy right field in the ViewState decoder window. The following image shows this being done:

Now I need to click the “Encode†button for the ViewState. This will automatically update the ViewState field for this request.  Once I do that, I can “Resume†my request and let it complete.  When the request completes, I will see the login page reload, but this time it will pop up an alert box as shown in the next screen:
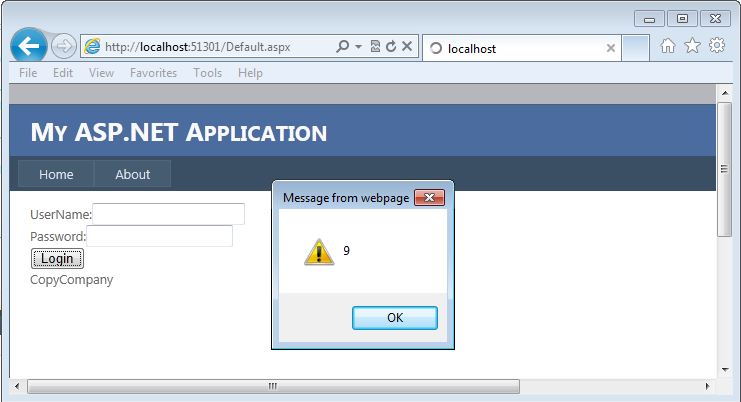
This shows that I was able to perform an XSS attack by manipulating a ViewState parameter. And as I mentioned earlier, this is reflected since it is being reflected from the ViewState. Win for the Attacker.
So What, I Can Attack Myself
Often times, when I talk about this technique, the first response is that the attacker could only run XSS against themselves since this is in the ViewState. How can we get that to our victim. The good news for the attacker…. .Net is going to help us attack our victims here. Without going into the details, the premise is that .Net will read the ViewState value from the GET or POST depending on the request method. So if we send a GET it will read it from the querystring.  So if we make the following request to the page, it will pull the ViewState values from the QueryString and execute the XSS just like the first time we ran it:
http://localhost:51301/Default.aspx?__VIEWSTATE=%2fwEPDwU
KLTE0NzExNjI2OA9kFgJmD2QWAgIDD2QWAgIFD2QWAgIHDw8WAh4
EVGV4dAUlQ29weTxzY3JpcHQ%2bYWxlcnQoOSk7PC9zY3JpcHQ%2b
Q29tcGFueWRkZA%3d%3d&ctl00%24MainContent%24txtUserName=
&ctl00%24MainContent%24txtPassword=
&ctl00%24MainContent%24cmdSubmit=Login
Since we can put this into a GET request, it is easier to send this out in phishing emails or other payloads to get a victim to execute the code. Yes, as a POST, we can get a victim to run this as well, but we are open to so much more when it is a GET request since we don’t have to try and submit a form for this to work.
How to Fix It
Developers can fix this issue quite easily. They need to encode the output for starters. For the encoding to work, however, you should set the value yourself on postback too. So instead of just setting that hard-coded value on initial page load, think about setting it every time. Otherwise the encoding will not solve the problem. Additionally, enable the built in functions like ViewStateMac, which will help prevent an attacker from tampering with the ViewState, or consider encrypting the ViewState.
Final Thoughts
This is a commonly overlooked area of security for .Net developers because there are many assumptions and mis-understandings about how ViewState works in this scenario. The complexity of configuration doesn’t help either. Many times developers think that since it is a hard-coded value.. it can’t be manipulated.  We just saw that under the right circumstances, it very well can be manipulated.
As testers, we need to look for this type of vulnerability and understand it so we can help the developers understand the capabilities of it and how to resolve it. As developers, we need to understand our development language and its features so we don’t overlook these issues. We are all in this together to help decrease the vulnerabilities available in the applications we use.
Updated [11/12/2012]: Uploaded a video demonstrating this concept.
Another Request Validation Bypass?
Filed under: Development, Security
I stumbled across this BugTraq(http://www.securityfocus.com/archive/1/524043) on Security Focus today that indicates another way to bypass ASP.Net’s built in Request Validation feature. It was reported by Zamir Paltiel from Seeker Research Center showing us how using a % symbol in the tag name (ex. <%tag>) makes it possible to bypass Request Validation and apparently some versions of Internet Explorer will actually parse that as a valid tag. Unfortunately, I do not have the specifics of which versions of IE will parse this. My feeble attempts in IE8 and IE9 did not succeed (and yes, I turned off the XSS filter). I did a previous post back in July of 2011 (which you can read here: https://jardinesoftware.net/2011/07/17/bypassing-validaterequest/) which discussed using Unicode-wide characters to bypass request validation.
I am not going to go into all the details of the BugTraq, please read the provided link as Zamir has done a great write up for it. Instead, I would like to talk about the proper way of dealing with this issue. Sure, .Net provides some great built in features, Event Validation, Request Validation, ViewStateMac, etc., but they are just helpers to our overall security cause. If finding out that there is a new way to bypass Request validation opens your application up to Cross-Site Scripting… YOU ARE DOING THINGS WRONG!!! Request Validation is so limited in its own nature that, although it is a nice-to-have, it is not going to stop XSS in your site. We have talked about this time and time again. Input Validation, Output Encoding. Say it with me: Input Validation, Output Encoding. Lets briefly discuss what we mean here (especially you.. the dev whose website is now vulnerable to XSS because you relied solely on Request Validation).
Input Validation
There are many things we can do with input validation, but lets not get too crazy here. Here are some common things we need to think about when doing input validation:
- What TYPE of data are we receiving. If you expect an Integer, then make sure that the value casts to an Integer. If you expect a date-time, then make sure it casts to a date time.
- How long should the data be. If you only want to allow 2 characters (state abbreviation?) then only allow 2 characters.
- Validate the data is in a specific range. If you have a numeric field, say an age, then validate that it is greater than 0 and less than 150, or whatever your business logic requires.
- Define a whitelist of characters allowed. This is big, especially for free-form text. If you only allow letters and numbers then only allow letters and numbers. This can be difficult to define depending on your business requirements. The more you add the better off you will be.
Output Encoding
I know a lot of people will disagree with me on this, but I personally believe that this is where XSS is getting resolved. Sure, we can do strict input validation on the front end. But what if data gets in our application some other way, say a rogue DBA or script running directly against the server. I will not get into all my feelings toward this, but know that I am all for implementing Input Validation. Now, on to Output Encoding. The purpose is to let the client or browser be able to distinguish commands from data. This is done by encoding command characters that the parser understands. For Example, for HTML the < character gets replaced with <. This tells the parser to display the less than character rather than interpret it as the start of a tag definition.
Even with all the input validation in the world, we must be encoding our output to protect against cross site scripting. It is pretty simple to do, although you do have to know what needs encoding and what does not. .Net itself makes this somewhat difficult since some controls auto encode data and others do not.
Can We Fix It?
With little hope that this will get resolved within the .Net framework itself, there are ways that we can update Request Validation ourselves, if you are using 4.0 or higher. Request Validation is Extensible, so it is possible to create your own class to add this check into Request Validation. I have included a simple PROOF OF CONCEPT!!! of attempting to detect this. THIS CODE IS NOT PRODUCTION READY and is ONLY FOR DEMONSTRATION PURPOSES.. USE AT YOUR OWN RISK!. ok enough of that. Below is code that will crudely look for the presence of the combination of <% in the request parameter. There are better ways of doing this, I just wanted to show that this can be done. Keep in mind, that if your application allows the submission of this combination of characters, this would probably not be a good solution. Alright.. the code:
using System;
using System.Collections.Generic;
using System.Linq;
using System.Web;
using System.Web.Util;

namespace WebTester
{
    public class NewRequestValidation : RequestValidator
    {
        public NewRequestValidation() { }

        protected override bool IsValidRequestString(
            HttpContext context,
            string value,
            RequestValidationSource requestValidationSource,
            string collectionKey,
            out int validationFailureIndex)
        {
            validationFailureIndex = -1;

            // This check is not meant to be production code...
            // This is just an example of how to set up
            // a Request Validator override.
            // Please pick a better way of searching for this.
            if (value.Contains("<%")) // Look for <%...
            {
                return false;
            }
            else // Let the default Request Validtion take a look.
            {
                return base.IsValidRequestString(
                    context,
                    value,
                    requestValidationSource,
                    collectionKey,
                    out validationFailureIndex);
            }
        }
    }
}
In order to get a custom request validation override to work in your application, you must tell the application to use it in the web.config. Below is my sample web.config file updated for this:
  <system.web>
    <httpRuntime requestValidationType="WebTester.NewRequestValidation"/>
  </system.web>
Conclusion
We, as developers, must stop relying on built in items and frameworks to protect us against security vulnerabilities. We must take charge and start practicing secure coding principles so that when a bug like this one is discovered, we can shrug it off and say that we are not worried because we are properly protecting our site.
Hopefully this will not affect many people, but I can assure you that you will start seeing this being tested during authorized penetration tests and criminals. The good news, if you are protected, is that it is going to waste a little bit of the attacker’s time by trying this out. The bad news, and you know who I am talking about, is that your site may now be vulnerable to XSS. BTW, if you were relying solely on Request Validation to protect your site against XSS, you are probably already vulnerable.
Request Method Can Matter
Filed under: Development, Security
One of the nice features of ASP.Net is that many of the server controls populate their values based upon the request method. Lets look at a quick example. If the developer has created a text box on the web form, called txtUserName, then on a post back the Text property will be populated from the proper request collection based on the request method. So if the form was sent via a GET request, then txtUserName.Text is populated from Request.QueryString[“txtUserNameâ€]. If the form was sent via a POST request, then txtUserName.Text is populated from Request.Form[“txtUserNameâ€]. I know, master pages and other nuances may change the actual name of the client id, but hopefully you get the point.
GET REQUEST
txtUserName.Text = Request.QueryString[“txtUserNameâ€]
POST REQUEST
txtUserName.Text = Request.Form[“txtUserNameâ€]
Although this is very convenient for the developer, there are some concerns on certain functionality that should be considered. Think about a login form. One of the security rules we always want to follow is to never send sensitive information in the URL. With that in mind, the application should not allow the login form to be submitted using a GET request because the user name and password would be passed via the query string. By default, most login forms will accept both GET and POST requests because of how the framework and server controls work. Why would someone use a get request? Automation? Easy login, think for example if I craft the proper URL and bookmark the login page so it auto logs me in to the site. Although not very common we, as developers, have to protect our users from abusing this type of flaw. In no way am I saying not to use the server controls.. they are great controls. The point is to be aware of the pitfalls in some situations.
The good news!! We just need to check the request method and only accept POST requests. If we receive a GET request, just reject it. Yes, a user can still submit the GET request, but it won’t authenticate them and defeats the purpose of the user. Lets take a moment to look at some code that uses the default functionality.
Below is a VERY simple method that demonstrates how both GET and POST requests act. Although it is not anything more than Response.Write calls, it is sufficient to demonstrate the point.
protected void Page_Load(object sender, EventArgs e)
{
       if (Page.IsPostBack)
       {
            // Encode the Value from the TextBox
            Response.Write(HttpUtility.HtmlEncode(txtUserName.Text));
            Response.Write(":");
            // Encode the value from the TextBox
            Response.Write(HttpUtility.HtmlEncode(txtPassword.Text));
        }
}
Here is a POST Request:
POST http://localhost:60452/Default.aspx HTTP/1.1
Accept: text/html, application/xhtml+xml, */*
Referer: http://localhost:60452/Default.aspx
Accept-Language: en-US
User-Agent: Mozilla/5.0 (compatible; MSIE 9.0; Windows NT 6.1; WOW64; Trident/5.0)
Content-Type: application/x-www-form-urlencoded
Accept-Encoding: gzip, deflate
Host: localhost:60452
Content-Length: 316
Connection: Keep-Alive
Pragma: no-cache
Cookie: .ASPXANONYMOUS=YQOZB3SHzQEkAAAANDE
4NDczYzctZjVmNi00ZWEzLWJkYTMtZDZjYmZhN
zY0Y2MylOoTQwCvDTUzA6LJuOO33witVabGXV
4RoXUeyg52RDY1;
ASP.NET_SessionId=jkne3su2dwemw0lu1kqbjrdq

__VIEWSTATE=%2FwEPDwUJNjk1NzE5OTc4ZGRjhRm%2FtVkqPqFadKC
IAA0lQHoBH0FsR4xVM%2FiTGn7Sew%3D%3D&__EVENTVALIDATION=%2
FwEWBALk1bPACQKMrfuqAgKOsPfSCQKP5u6DCONM%2B3R6i2D%2
FIRsWvIhZp5wqldnzoa%2BjoUVRrng5kifu&ctl00%24
MainContent%24txtUserName=jjardine&ctl00%24MainContent%24
txtPassword=password&ctl00%24MainContent%24cmdSubmit=
The application will write out “jjardine:password†to the browser. This makes sense since those two values were passed. Now lets take a look at a GET Request and see the same request:
http://localhost:60452/Default.aspx?__VIEWSTATE=%2FwEPDwUJNjk1N
zE5OTc4ZGRjhRm%2FtVkqPqFadKCIAA0lQHoBH0FsR4xVM%2FiTGn7Sew
%3D%3D&__EVENTVALIDATION=%2FwEWBALk1bPACQKMrfuqAgKOsP
fSCQKP5u6DCONM%2B3R6i2D%2FIRsWvIhZp5wqldnzoa%2BjoUVRrng
5kifu&ctl00%24MainContent%24txtUserName=jjardine
&ctl00%24MainContent%24txtPassword=password&
ctl00%24MainContent%24cmdSubmit=
Again, this output will write out “jjardine:password†to the browser. The big difference here is that we are sending sensitive information in the URL which, as mentioned above, is a big no-no. We can’t stop a user from submitting a request like this. However, we can decide to not process it which should be enough to get someone to stop doing it.
It is important to note that any form that has sensitive information and uses the server controls like this can be vulnerable to this issue. There are some mitigations that can be put in place.
Check the Request Method
It is very easy to check the request method before processing an event. The below code shows how to implement this feature:
protected void Page_Load(object sender, EventArgs e)
{
    if (Page.IsPostBack)
    {
        if (Request.RequestType == "POST")
        {
            // Encode the Value from the TextBox
            Response.Write(HttpUtility.HtmlEncode(txtUserName.Text));
            Response.Write(":");
            // Encode the value from the TextBox
            Response.Write(HttpUtility.HtmlEncode(txtPassword.Text));
        }
    }
}
Now, if the request is not a POST, it will not process this functionality. Again, this is a very simplistic example.
Implement CSRF Protection
Implementing CSRF protection is beyond the scope of this post, but the idea is that there is something unique about this request per the user session. As we saw in the GET request example, there are more parameters than just the user name and password. However, in that example, these fields are all static. There is no randomness. CSRF protection adds randomness to the request so even if the user was able to send a get request, their next session attempt would no longer work because of this missing random value.
Large Data
So large data doesn’t sound like a lot here, but it is a mitigation based on the construction of the page. If the viewstate and other parameters become really long, then they will be too large to put in the URL (remember this is usually limited on length). If that is the case, the user will not be able to send all the parameters required and will be blocked. This is usually not the case on login pages as there is usually very little data that is sent. The viewstate is usually not that big so make sure you are aware of those limits.
Why do we care?
Although this may not really seem like that big of an issue, it does pose a risk to an application. Due to compliance reasons related to storing sensitive information in log files, doing our part in protecting users data (especially authentication data), and the fact that this WILL show up on penetration testing reports, this is something that should be investigated. As you can see, it is not difficult to resolve this issue, especially for the login screen.
In addition to the login screen, if other forms are set up to support both GETS and POSTS, it could make CSRF attacks easier as well. Although we can do a CSRF attack with a POST request, a GET can be deployed in more ways. This risk is often overlooked, but is an easy win for developers to implement. Happy Coding!!
Handling Request Validation Exceptions
Filed under: Development
I write a lot about the request validation feature built into .Net because I believe it serves a great purpose to help reduce the attack surface of a web application. Although it is possible to bypass it in certain situations, and it is very limited to HTML context cross site scripting attacks, it does provide some built in protection. Previously, I wrote about how request validation works and what it is ultimately looking for. Today I am going to focus on some different ways that request validation exceptions can be handled.
No Error Handling
How many times have you seen the “Potentially Dangerous Input” error message on an ASP.Net application? This is a sure sign to the user that the application has request validation enabled, but that the developers have not taken care to provide friendly error messages. Custom Errors, which is enabled by default, should even hide this message. So if you are seeing this, there is a good chance there are other configuration issues with the site. The following image shows a screen capture of this error message:
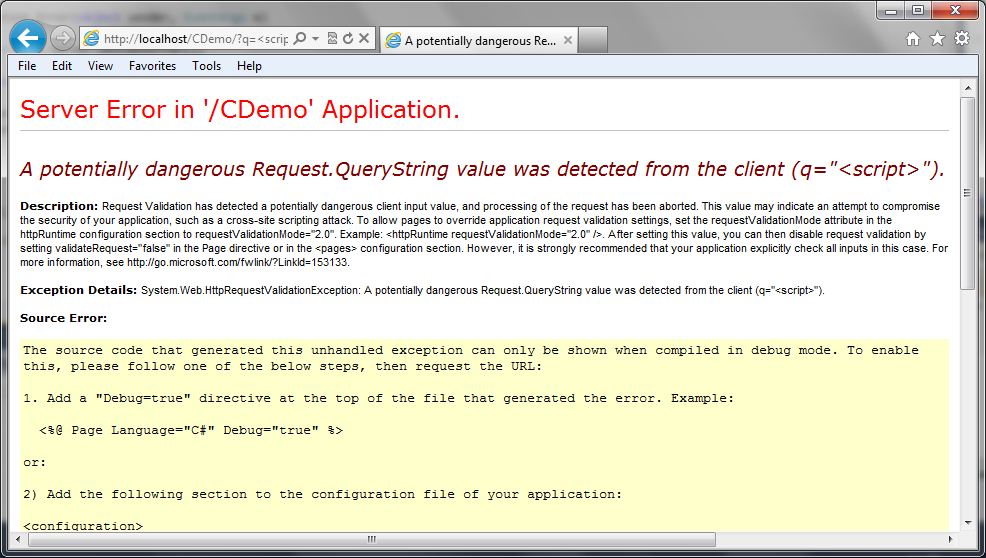
This is obviously not the first choice in how we want to handle this exception. For one, it gives out a lot of information about our application and it also provides a bad user experience. Users want to have error messages (no one really wants error messages) that match the look and feel of the application.
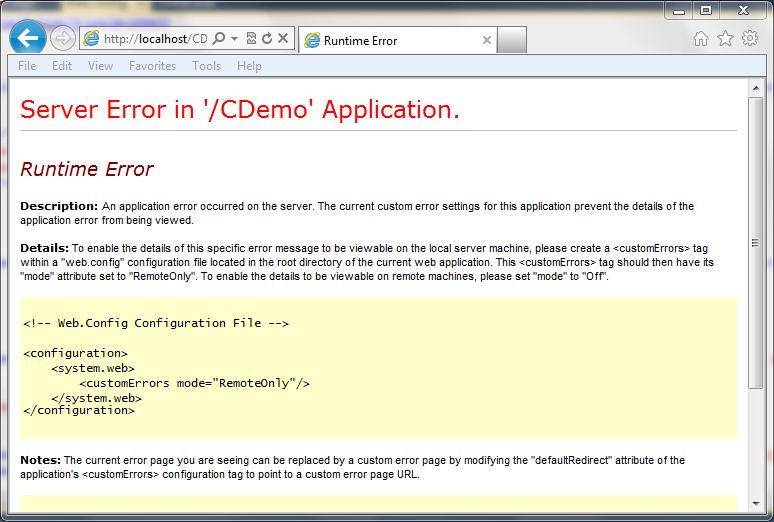
Custom Errors
ASP.Net has a feature called “Custom Errors” which is the final catch in the framework for exceptions within an ASP.Net application. If the developer hasn’t handled the exception at all, custom errors picks it up (that is, if it is enabled (default)). Just enabling customer errors is a good idea. If we just set the mode to “On” we get a less informative error message, but it still doesn’t look like the rest of the site.
The following code snippet shows what the configuration looks like in the web.config file:
<system.web>
<customErrors mode="On" />
The following screen shot shows how this looks:
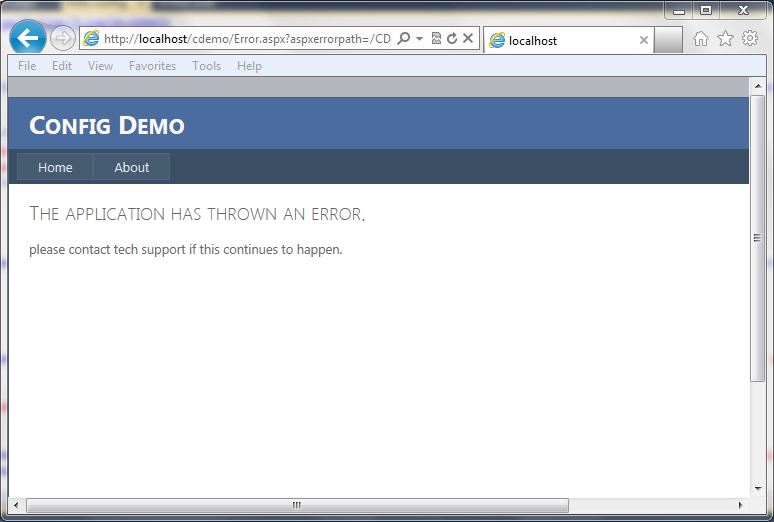
Custom Errors with Redirect
Just turning customer errors on is helpful, but it is also possible to redirect to a generic error page. This allows the errors to go to a page that contains a generic error message and can look similar to how the rest of the site looks. The following code snippet shows what the configuration looks like in the web.config file:
<system.web>
<customErrors mode="On" defaultRedirect="Error.aspx" />
The screen below shows a generic error page:
Custom Error Handling
If you want to get really specific with handling the exception, you can add some code to the global.asax file for the application error event. This allows determing the type of exception, in this case the HTTPRequestValidationException, and redirecting to a more specific error page. The code below shows a simple way to redirect to a custom error page:
void Application_Error(object sender, EventArgs e)
{
Exception ex = Server.GetLastError();
if (ex is HttpRequestValidationException)
{
Server.ClearError();
Response.Redirect("RequestValidationError.aspx", false);
}
}
Once implemented, the user will get the following screen (again, this is a custom screen for this application, you can build it however you like):

As you can see, there are many ways that we can handle this exception, and probably a few more. This is just an example of some different ways that developers can help make a better user experience. The final example screen where it lists out the characters that are triggering the exception to occur could be considered too much information, but this information is already available on the internet and previous posts. It may not be very helpful to most users in the format I have displayed it in, so make sure that the messages you provide to the users are in consideration of their understanding of technology. In most cases, just a generic error message is acceptable, but in some cases, you may want to provide some specific feedback to your users that certain data is not acceptable. For example, the error message could just state that the application does not accept html characters. At the very least, have custom errors enabled with a default error page set so that overly verbose, ugly messages are not displayed back to the user.
ASP.Net: Tampering with Event Validation – Part 2
In part 1 of this series I demonstrated how to modify the values of a list box and access data I was not given access to by manipulating the view state and event validation parameters. Remember, the key to this is that ViewStateMac must be disabled. In this post, I will be demonstrating triggering button events that are not available to me.
Target Application
The target application has a simple screen that has a drop down list with some transactions and a button to view the selected transaction.
Image 1

When a user selects a transaction and clicks the “View Transaction†button, the transaction is loaded (see Image 2).
Image 2

As seen in Image 1 above, some users have access to delete the selected transaction. Image 3 shows what happens when we delete the transaction. (For this demo, the transaction is actually not deleted, a message is just displayed to make things simple.
Image 3

Unfortunately, the account I am using doesn’t allow me to delete transactions. Lets take a look at how we can potentially bypass this so we can delete a transaction we don’t want.
Tools
I will only be using Burp Suite Pro and my custom Event Validation tool for this. Other proxies can be used as well.
The Process
Lets take a look at the page as I see it (See Image 4). I will click the “View Transaction†button and view a transaction. Notice that there is no “Delete†button available.
Image 4

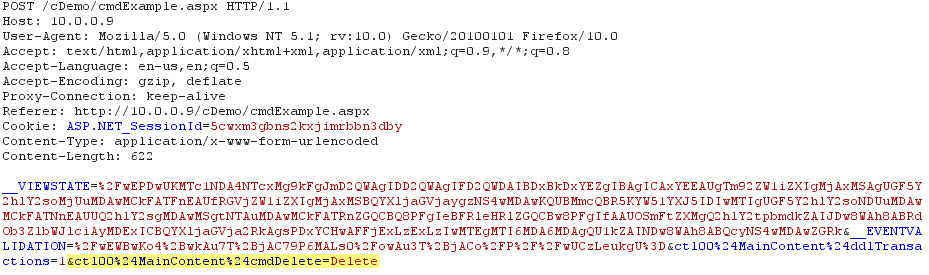
When I view the source of the page (Tools…View Source) I can see that the id of the “Get Transaction†button is ctl00$MainContent$cmdGetTransaction. In some cases, I may have access to the details of the delete button (that is currently invisible). In most cases, I may be stuck just making educated guesses as to what it might be. In this case I do know what it is called (ctl00$MainContent$cmdDelete), but one could easily make simple guesses like cmdDelete, cmdRemove, cmdDeleteTransaction, etc..
I like to avoid doing any url encoding myself, so my first step is to change my proxy into intercept mode and select a transaction to view. I want to intercept the response so that I can modify my __EVENTVALIDATION field before it goes to my page. I need to add in my button to the __EVENTVALIDATION so that ASP.Net will accept it as valid. I will use the custom Event Validation tool to do this. Image 5 shows the Event Validation application with the needed changes.
Image 5

After modifying the __EVENTVALIDATION field, I will update that in my intercepted response and then let the page continue.
Original __EVENTVALIDATION
/wEWBgKo4+wkAu7T+jAC79P6MALs0/owAu3T+jACo/P//wU=
Modified __EVENTVALIDATION
/wEWBwKo4+wkAu7T+jAC79P6MALs0/owAu3T+jACo/P//wUCzLeukgU=
Now that I have modified the data on my current page, the next step is to Click the “View Transaction†button again to trigger a request. The triggered request is shown in Image 6.
Image 6

This request is triggering a “View Transaction†request, which is what we do not want. We need to change this request so that it is calling the “Delete†command instead. You can see the change in Image 7 below.
Image 7
When I continue the request and turn my intercept off I can see that my delete button click did fire and I get the message alerting me that the item was deleted (Image 8).
Image 8

Additional Notes
Since this is using a drop down list to define the transaction we are dealing with, I could combine the concepts from Part 1 in this series to delete other transactions that may not even be mine. There are a lot of possibilities with tampering with the Event Validation and View State that can cause big problems.
Conclusion
This is an overly simplified example of how events that are meant to be hidden from users can be triggered when ViewStateMac is disabled. It is important that if you are changing the visibility of buttons or other controls that trigger events based on users roles, that the actual event checks to make sure that the current user is authorized to perform its function. I personally like all of the built in security features that .Net has, but no one should rely solely on them. Of course, there are multiple factors that go into this vulnerability, so if things are not just right, it may not work.
This information is provided as-is and is for educational purposes only. There is no claim to the accuracy of this data. Use this information at your own risk. Jardine Software is not responsible for how this data is used by other parties.
ASP.Net Webforms CSRF Workflow
Filed under: Security, Testing
An important aspect of application security is the ability to verify whether or not vulnerabilities exist in the target application. This task is usually outsourced to a company that specializes in penetration testing or vulnerability assessments. Even if the task is performed internally, it is important that the testers have as much knowledge about vulnerabilities as possible. It is often said that a pen test is just testing the tester’s capabilities. In many ways that is true. Every tester is different, each having different techniques, skills, and strengths. Companies rely on these tests to assess the risk the application poses to the company.
In an effort to help add knowledge to the testers, I have put together a workflow to aid in testing for Cross Site Request Forgery (CSRF) vulnerabilities. This can also be used by developers to determine if, by their settings, their application may be vulnerable. This does not cover every possible configuration, but focuses on the most common. The workflow can be found here: CSRF Workflow. I have also included the full link below.
Full Link: http://www.jardinesoftware.com/Documents/ASP_Net_Web_Forms_CSRF_Workflow.pdf
Happy Testing!!
The information is provided as-is and is for educational purposes only. Jardine Software is not liable or responsible for inappropriate use of this information.
ASP.Net: Tampering with Event Validation – Part 1
Filed under: Development, Security
UPDATED 12/13/2012 – This post was updated to include a video demonstration of tampering with data with Event Validation enabled. The video is embedded at the bottom of the post.
My last post brought up the topic of tampering with Event Validation (__EVENTVALIDATION) and how it is protected with the ViewStateMAC property. This post, and the next few, will focus on how to actually tamper with the values in Event Validation to test for security vulnerabilities. We will use a very basic demo application to demonstrate this.
Target Application
The target application has a simple screen with a drop down list, a button, and a data grid that displays the selected account information. The drop down list is populated with accounts for the logged on user only. I will show how the data can be modified to view another account that we were not granted access to. It is important to note that there are many variables to requests and this assumes that authorization was only checked to fill the drop down list and not when an actual account is selected. This is a pretty common practice because it is assumed that event validation will only allow the authorized drop down items (the accounts in this instance) to be selected by the user. Not all applications are written in this way, and the goal is to test to see if there is authorization or parameter tampering issues.
Tools
I will use multiple tools to perform this test. These tools are personal choice and other tools could be used. The first, and my favorite, is Burp Suite Pro. This will be my main proxy, but that is just because I like how it works better than some others. Secondly, I will be using Fiddler and the ViewState Viewer plug-in to manipulate the View State field. Finally, I have a custom application that I wrote to generate the Event Validation codes that I need to make this work.
The Process
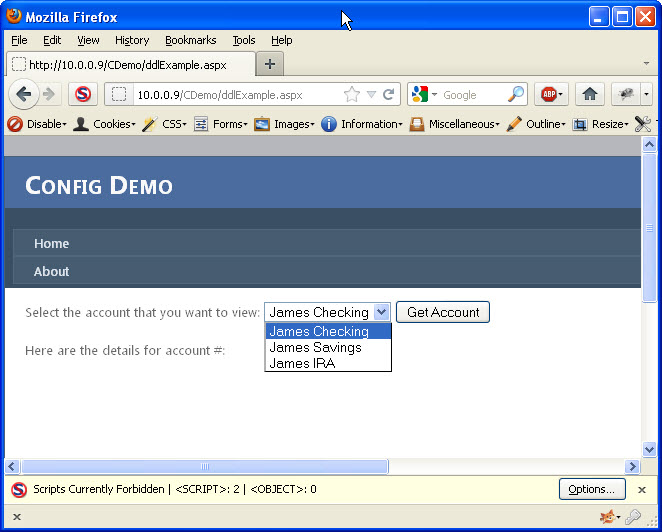
First, I will just load the application and view the target page. Image 1 shows the initial screen with the values from the drop down list. Notice that only 3 accounts are available and they are all for James. By looking at the source for the drop down list, I can see that the values for each of those items are numeric. This is a good sign, for testing purposes. Numeric values are usually easier at determining, especially if you can find a simple pattern.
Image 1
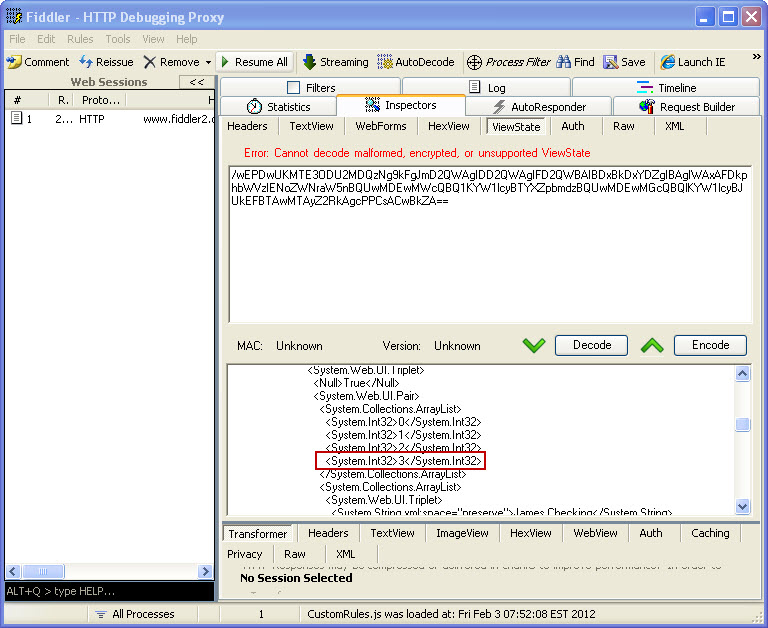
Next, it is time to de-serialize the view state so we can modify it for the value we want to add. To do this, I will use Fiddler and the ViewState Viewer plug-in. There are two changes I need to make. First, I need to add an item to the ArrayList (seen in Image 2).
Image 2
Second, I need to add the drop down list item I want to try and access. The text will not matter, but the value that I add is the key. Although this may not always be the case, in this simple example, that is what the application uses to query the account data. The value needed could be known, or you could just attempt to try different values until you find one that works. The added item can be seen here in Image 3.
Image 3

Now that my view state has modified, I can press the “Encode” button and get the updated view state. Here is the original and modified view state values:
Original __VIEWSTATE
/wEPDwUKMTE3ODU2MDQzNg9kFgJmD2QWAgIDD2QWAgIFD2QWBAIBDxBkDxYDZg
IBAgIWAxAFDkphbWVzIENoZWNraW5nBQUwMDEwMWcQBQ1KYW1lcyBTYXZpbmdz
BQUwMDEwMGcQBQlKYW1lcyBJUkEFBTAwMTAyZ2RkAgcPPCsACwBkZA==
Modified __VIEWSTATE
/wEPDwUKMTE3ODU2MDQzNg9kFgJmD2QWAgIDD2QWAgIFD2QWBAIBDxBkDxYEZg
IBAgICAxYEEAUOSmFtZXMgQ2hlY2tpbmcFBTAwMTAxZxAFDUphbWVzIFNhdmluZ3M
FBTAwMTAwZxAFCUphbWVzIElSQQUFMDAxMDJnEAUOSGFja2VkIEFjY291bnQFBTA
wMjAxZ2RkAgcPPCsACwBkZA==
The next step is to modify the Event Validation value. There are two options to modify this value:
- Use Fiddler and the ViewState Viewer (just like how we just modified the view state)
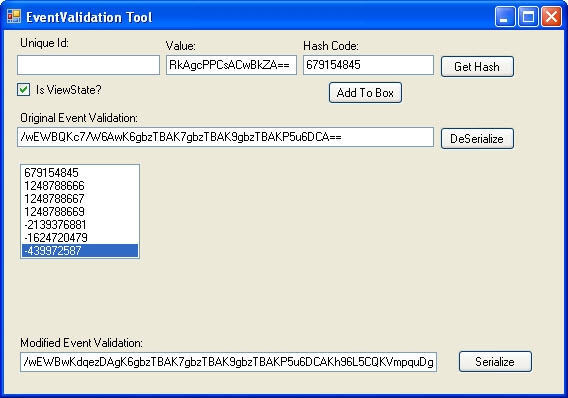
- Use my custom application. This is the method I will use for this example. See Image 4 for a reference to the application.
I will retrieve the __EVENTVALIDATION value from the response and paste it into the Original Event Validation textbox and “De-Serialize” it. This will populate the list box with all of the original hash values. To add custom data, we must use the same technique that the ASP.Net uses to calculate the hash value for the items. There are two values we need to modify in this example.
- First, I need to modify our allowed viewstate hash. To do this, I will put my modified __VIEWSTATE value into the “Value” textbox and click the “Get Hash” button. View State is a little different than other control data in that it does not require a Unique Id to be associated with it to generate the hash. The hash value generated is 679154845. This value must be placed in the first array item in event validation.
- Second, I need to add my own drop down item. Previously, I added this to the view state and used a value of 00201. Adding it to event validation is a little different. I will enter in the value (00201) into the “Value” box, and then enter the drop down lists unique id (ctl00$MainContent$ddlAccounts) into the “Unique Id:” textbox. Clicking the “Get hash” button produces the following hash: 439972587. I then add this hash value to the array.
Now that my two hashes have been added, it is time to serialize the data back into the __EVENTVALIDATION value. Here are the two different values we worked with:
Original __EVENTVALIDATION
/wEWBQKc7/W6AwK6gbzTBAK7gbzTBAK9gbzTBAKP5u6DCA==
Modified __EVENTVALIDATION
/wEWBwKdqezDAgK6gbzTBAK7gbzTBAK9gbzTBAKP5u6DCAKh96L5CQKVmpquDg==
Image 4
Due to the time it can take to perform the above steps, I like to do them without holding up my request. Now that I have the values I need, I will refresh my page with my proxy set to intercept the response. I will then modify the response and change the __VIEWSTATE and __EVENTVALIDATION values to my new modified ones. I will let the response continue to allow my page to display.
At this point, nothing appears to have happened. There is no additional drop down list item or anything else to indicate that this has worked. The key is to now just select an existing account and hit the “Get Account” button. If there is an error, something didn’t work right. If you were successful, the page should re-load and you should see a new Drop down List item (See Image 5)
Image 5
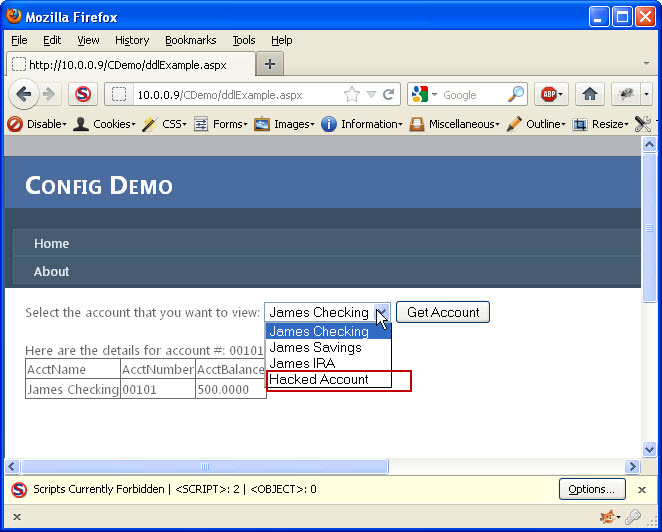
I now need to determine if I was lucky enough to pick a valid account number. I will select the “Hacked Account” list item (which is the one I added) and click the “Get Account” button. If no data comes back then the account number did not exist. It is back to the drawing board to try again with a different number. If, however, account details did show up, then I have successfully accessed data I was not given access to. Image 6 shows the results of a successful attempt.
Image 6

Conclusion
This showed the steps necessary to manipulate both view state and event validation to tamper with the allowed accounts were were authorized to see. This requires that ViewStateMAC is disabled and that the view state has not been encrypted. If either of those two factors were different, this would not be possible. This demonstrates the importance of ensuring that you use ViewStateMAC to protect your view state AND event validation. You should also be performing authorization checks on each request that requests sensitive information from your application. This example application is completely fictional and there are no claims that this represents the way that any production application actually works. It will be used to demonstrate the different techniques used to develop applications to understand how they can be fixed.
This information is provided as-is and is for educational purposes only. There is no claim to the accuracy of this data. Use this information at your own risk. Jardine Software is not responsible for how this data is used by other parties.
ViewStateMAC: Seriously, Enable It!
Filed under: Development, Security
I have been doing a lot of research lately around event validation and view state. I have always been interested in how Event Validation worked under the covers and if it could be tampered with. I will attempt to explain that it is, in fact, possible to tamper with the Event Validation field in a similar manner that view state can be tampered. I know, the title of the post reads “ViewStateMACâ€, don’t worry I will get to that. But first, it is important to discuss a little about how Event Validation works to understand why ViewStateMAC is important.
__EVENTVALIDATION – Basics
Event Validation is a feature that is built into ASP.Net web forms. It is enabled by default and it serves the purpose to ensure that only valid data is received for controls that register valid events or data. As a quick example, think for a moment about a drop down list. Each value that is programmatically added to the control will be registered with Event Validation. Code Example 1 demonstrates loading values into a drop down list (data binding is also very common). Each of these values will now exist in the Event Validation feature. When a user attempts to submit a form, or post back, the application will verify the value submitted for that control is a valid value. If it is not, a not so pretty exception is generated.
{
  ddlList.Items.Add(new ListItem("1", "1"));
  ddlList.Items.Add(new ListItem("2", "2"));
  ddlList.Items.Add(new ListItem("3", "3"));
  ddlList.Items.Add(new ListItem("4", "4"));
  ddlList.Items.Add(new ListItem("5", "5"));
}
__EVENTVALIDATION – Hash
Event Validation is primarily based on storing a hash value for each of the values it needs to check for validity. More specifically, there is a specific routine that is run to create an integer based hash from the control’s unique id and the specified value (the routine is beyond the scope of this post). Every value that gets stored in Event Validation has a corresponding integer hash value. These hash values are stored in an array list which gets serialized into the string that we see in the __EVENTVALIDATION hidden form field on the web page.
__EVENTVALIDATION – Page Response
When a page is requested by the user it goes through an entire lifecycle of events. To understand how Event Validation really works, lets first take a look at how the field is generated. Before the page is rendered, each control or event that is registered for event validation will have its value hashed (see previous section) and added to the array list. As mentioned before, this can be values for a list control, valid events for the page or controls (for example, button click events), and even View State. This array is serialized and stored in the __EVENTVALIDATION hidden field.
__EVENTVALIDATION – Post Back Request
The request is where Event Validation takes action. When a user submits a post back to the server, event validation will validate the values that have been registered. So in the Drop Down List example in "Example 1†Event Validation is there to make sure that only the values 1-5 are submitted for ddlList. It does this by taking the value that was sent (Request.Form[“ddlListâ€]) and re-generates the numeric hash. The hash is then compared to the list and if it exists, the value is allowed. If it doesn’t exist in the de-serialized Event Validation list, then an exception is thrown and the page cannot continue processing.
__EVENTVALIDATION – Manipulation
De-serializing the Event Validation value is pretty easy. This is very similar to how it is done for View State. After writing my own tool to tamper with the Event Validation, I found the ViewState Viewer (http://labs.neohapsis.com/2009/08/03/viewstateviewer-a-gui-tool-for-deserializingreserializing-viewstate/) plug-in for Fiddler. The ViewState Viewer plugs right into Fiddler with no issues. Don’t let the name mislead you, this tool works great with the Event Validation data as well. When you paste in your Event Validation string and click the “Decode†button, it generates a nice XML snippet of the contents. The screen shot below demonstrates the Event Validation value and its decoded value from a test page I created.
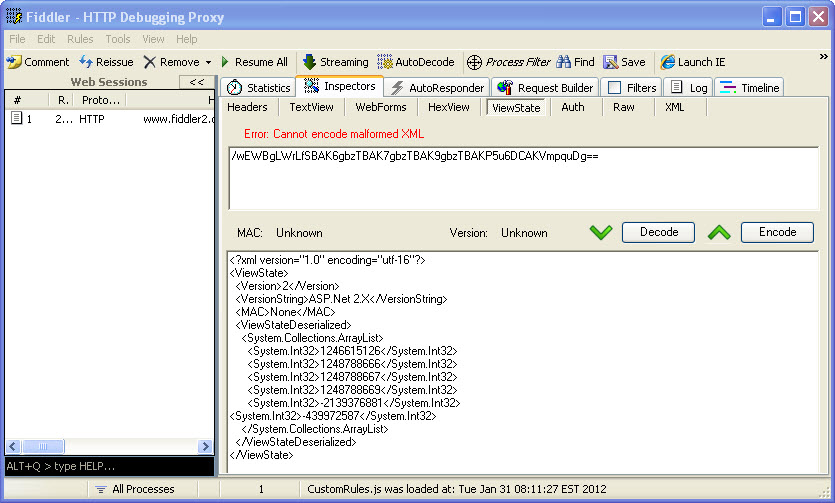
Once you have the information decoded, you can now add in your own integers to the System.Collections.ArrayList. Look closely and you might see that the last integer –439972587 is not aligned with the rest of the items. This is because that is a custom value that I added to the event validation. These numbers don’t look like they really mean anything, but to Event Validation, they mean everything. If we can determine how to create our own numbers, we can manipulate what the server will see as valid data. Once you have made your modifications, click the “Encode†button and the value in the top box will refresh with the new __EVENTVALIDATION value. It may be possible to attempt brute forcing the data you want (if you can’t create the exact hash code) by just padding a bunch of integers into the list and submitting your modified data. This is definitely hit or miss, could be time consuming, and would probably generate a lot of errors for someone to notice. We are monitoring our error logs right?
__EVENTVALIDATION – Thoughts
Maybe just me, but I always thought that if I had event validation enabled, as a developer, I didn’t have to validate the data from drop down lists that was submitted. I thought that this type of data was protected because event validation enforced these constraints. This is obviously not the case and honestly brings up a very important topic for another day; “We shouldn’t be relying solely on configuration for protectionâ€. Although this post uses the drop down lists as an example, this has a much greater effect. What about buttons that are made visible based on your role. If event validation can be tampered with, now those buttons that didn’t exist, can have their events added to the acceptable list. If you are not checking that the user has the proper role within that event, you may be in big trouble.
So what types of attacks are possible?
- Parameter tampering
- Authorization bypass
- Cross Site Scripting
- Maybe More…
ViewStateMAC – Finally!!
Ok, it is not all bad news and finally we come to our friend (or worst enemy if it is disabled) ViewStateMAC. Keep in mind that ViewStateMAC is enabled by default, so if this is disabled, it was done explicitly. ViewStateMAC adds a message authentication code to ViewState obviously, judging by its name. Basically, it adds a hash to the view state so that an attacker cannot tamper with its data. So if we go back to the drop down list, if a developer uses code like Example 2 to access the selected item, then you have to be able to tamper the view state, otherwise the first item in the original item will get selected. But if you use code like Example 3 to access that data, you could add your value to the EventValidation and get it accepted by the application. Or can you?
{
  Response.Write(ddlList.SelectedItem.Value);
}
{
  Response.Write(Request.Form["ddlList"].ToString());
}
Actually, ViewStateMAC does more than sign ViewState, it also signs the Event Validation value. I was not able to identify any documentation on MSDN that indicates this feature, but apparently __PREVIOUSPAGE may get signed with this as well. I have run extensive tests and can confirm that ViewStateMAC is critical to signing Event Validation. So in general, If ViewStateMAC is enabled, it protects both ViewState and Event Validation from being tampered with. That is pretty important and I am not sure why it is not listed on MSDN. Unfortunately, disable it and it creates a much greater security risk than initially thought because it effects more than ViewState.
ViewStateMAC – Not a Replacement for Input Validation
In no way should a developer rely solely on ViewStateMAC, Event Validation and ViewState as their means of input validation. The application should be developed as if these features do not even exist. Drop down lists should be validated that only valid values were submitted. Control events should be verified that they are allowed. Why not use these features? I am not saying that you should not use these features, but they should be in addition to your own input validation. What if ViewStateMAC were to get disabled during testing, or for some other unknown reason? Even if Event Validation is still enabled, it is not looking good. Unless you have ViewState being encrypted, which would help block tampering with the view state, an attacker could still manipulate the event validation code.
Conclusion
The details provided here have been high level with not much actual detail in actually manipulating the Event Validation field. The post would be too long to include all the details here. Hopefully there is enough information to make developer’s aware of the severity of ViewStateMAC and how Event Validation actually works. From a penetration tester’s view, if you visit a .net webform application with ViewStateMAC disabled, this should be researched more to help accurately identify risk for the application. Devs, please, please, please do not disable this feature. If you are on a web farm, make sure the same machine key is set for each machine and this should be supported. Remember, these features are helpers, but not complete solutions. You are responsible for performing proper input validation to ensure that the data you expect is what you accept.
The information provided is for informational and educational purposes only. The information is provided as-is with no claim to be error free. Use this information at your own risk.
ASP.Net Insecure Redirect
Filed under: Development, Security
It was recently discovered that there was a vulnerability within the ASP.Net Forms Authentication process that could allow an attacker to force a user to visit a malicious web site upon success authentication. Until this vulnerability was found, it was thought that the only way to allow the Forms Authentication redirect (managed by the ReturnUrl parameter) to redirect outside of the host application’s domain was to set enableCrossAppRedirects to true in the web.config file. If this property was set to false, the default value, then redirection could only occur within the current site.
So how does it work? When a user navigates to a page that requires authentication, and they are not currently authenticated, ASP.Net redirects them to the login page. This redirection appends a querystring value onto the url that, once successful login occurs, will allow the user to be redirected to the originally requested page. Here is an example (Assuming that EnableCrossAppRedirects=”False” ):
- User requests the following page: http://www.jardinesoftware.com/useredit.aspx
- The framework recognizes that the user is not authenticated and redirects the user to http://www.jardinesoftware.com/logon.aspx?ReturnUrl=useredit.aspx
- The user enters their login information and successfully authenticates.
- The application then analyzes the ReturnUrl and attempts to determine if the Url references a location with the current domain, or if it is outside of the domain. To do this, it uses the Uri object to determine if the Url is an Absolute path or not.
- If it is determined to NOT be an absolute path, by using the Uri object, then the redirect is accepted.
- If it is determined to be an absolute path, additional checks are made to determine if the hosts match for both the current site and the redirect site. If they do, a redirect is allowed. Otherwise, the user is redirected to the default page.
The details are not fully known at this time as to what the malicious link may look like to trick ASP.Net into believing that the Url is part of the same domain, so unfortunately I don’t have an example of that. If I get one, I will be sure to post it. It does appear that some WAF’s are starting to include some signatures to try and detect this, but that should be part of defense in depth, not the sole solution. Apply the patch. The bulletin for MS11-100 describes the patch that is available to remediate this vulnerability.
It is important to note that this is an issue in the FormsAuthentication.RedirectFromLogin method and not the Response.Redirect method. If you are doing the latter, through a custom login function, you would be required to validate the ReturnUrl. If you use the default implementation to redirect a user after credentials have been verified or use the built in asp:Login controls, you will want to make sure this patch gets applied.
This issue requires that a legitimate user clicks on a link that already has a malicious return url included and then successfully logs in to the site. This could be done through some sort of phishing scheme or by posting the link somewhere where someone would click on it. It is always recommended that when users go to a site that requires authentication that they type in the address to the site, rather than follow a link someone sent them.
This issue doesn’t have any impact on the site that requires authentication, it is strictly a way for attackers to get users to visit a malicious site of their own.
For more information you can read Microsoft’s Security Bulletin here: http://technet.microsoft.com/en-us/security/bulletin/ms11-100.
The information provided in this post is provided as-is and is for educational purposes only. It is imperative that developers understand the vulnerabilities that exist within the frameworks/platforms that they work with. Although there is not much you can really do when the vulnerability is found within the framework, understanding the possible workarounds and the risks associate with them help determine proper remediation efforts.
Creating the Reply With Meeting OL2007 Add-In (Part 1)
Filed under: Development
Note: This is the first part, in a multi-part series to create this add-in. I chose to break this up into multiple parts so some parts (like this one) could be used by anyone creating an add-in. This post will only create the add-in shell and will not show how to reply with a meeting. that piece will come in Part 2.
I have spent many years working with Microsoft Outlook add-ins and want to share some of my experience with other developers. Since Microsoft Outlook 2000, an API has been available for Office and all of its components. I have mostly focused on Microsoft Outlook over the years, so this post will demonstrate how to create a Microsoft Outlook add-in. More specifically, I will focus on Microsoft Outlook 2007 and use Visual Studio 2008 with C# to create the add-in. This post will show the initial creation of the project and the beginning of the add-in. I will have other posts to enhance the add-in. I chose this feature because it is included in Microsoft Outlook 2010.
Creating the Solution
The first step to creating the add-in is to open Visual Studio 2008 and select a new Project (Figure 1). The add-in will be named “ReplyWithMeetingAddInâ€.
Figure 1 (click to enlarge)

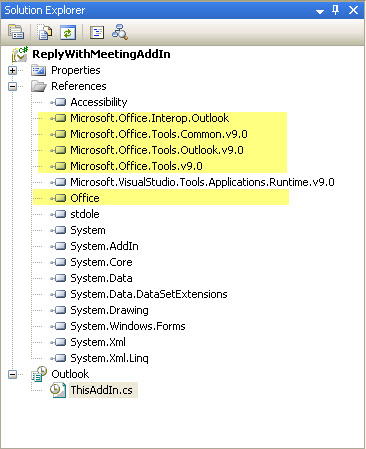
Once the project is created, there are a few items to notice. First, Visual Studio has already added the needed references to create the add-in. Figure 2 shows these references highlighted. The second file to notice is the main add-in file that was created, ThisAddIn.cs. This is the gateway to your add-in from Outlook.
Figure 2
Building the Add-in
At this point, we can build the add-in. Doing this will automatically install it into your Outlook 2007 application, although at this point the add-in doesn’t do anything. It is good to see that the add-in is present though. Here are the steps to verify that it installed into Outlook:
- Build the project from within Visual Studio by Right-clicking the project and selecting Build.
- Once the build has succeeded, restart Outlook (this is important!).
- In Outlook, click the Tools…Trust Center menu option.
- Select the Add-ins tab in the Trust Center (Figure 3).
- You should see your add-in listed in the Active Application Add-ins
Figure 3 (click to enlarge)

Writing the Add-in
The guts of the add-in start in the ThisAddIn.cs file, as mentioned above. This file initially has 2 events exposed (see Code 1).
- public partial class ThisAddIn
- Â Â Â Â {
- Â Â Â Â Â Â Â Â private void ThisAddIn_Startup(object sender, System.EventArgs e)
- Â Â Â Â Â Â Â Â {
- Â Â Â Â Â Â Â Â }
- Â Â Â Â Â Â Â Â private void ThisAddIn_Shutdown(object sender, System.EventArgs e)
- Â Â Â Â Â Â Â Â {
- Â Â Â Â Â Â Â Â }
ThisAddIn_Startup is used to initialize your add-in. Here you can create buttons for your add-in or link to other events within Outlook. An example would be to put System.Windows.Forms.MessageBox.Show(“Helloâ€); in this method. When outlook starts up, it will show a messagebox with your message.
ThisAddIn_Shutdown is used to clean up any resources you have used. Maybe you need to remove the buttons you created, or close down a data connection.
In Part 2 of this series, I will show the code to make the add-in useful. The add-in will be enhanced to add a button to the Main Outlook window and an email message window.
Debugging the Add-in
One of the great things about developing add-ins with Visual Studio 2008 is that debugging is easy to set up. The key to debugging the add-in is to setting Outlook as the startup action for the project. To do this, follow these steps:
- Double-click the properties for the project.
- Select the Debug tab.
- In the Start Action section, select the Start external program radio button.
- Browse to the Outlook.exe file (usually located at: C:\Program Files\Microsoft Office\Office12\OUTLOOK.EXE)
Now, when you run the add-in from within Visual Studio, it will start Outlook automatically. This will attack the debugger and you can set breakpoints just like any other application.
Wrap Up
This post shows the basic steps to create a Microsoft Outlook 2007 add-in with Visual Studio 2008. At this point, the add-in doesn’t do anything, but this is the same process every add-in starts with. In the next post, I will add the code to load the buttons into outlook so the user can reply to a message with a meeting request.
Disclaimer: This code is provided as-is. There is no guarantee to the accuracy of this information. Use this information at your own risk.
Follow Us