
ASP.Net: Tampering with Event Validation – Part 1
UPDATED 12/13/2012 – This post was updated to include a video demonstration of tampering with data with Event Validation enabled. The video is embedded at the bottom of the post.
My last post brought up the topic of tampering with Event Validation (__EVENTVALIDATION) and how it is protected with the ViewStateMAC property. This post, and the next few, will focus on how to actually tamper with the values in Event Validation to test for security vulnerabilities. We will use a very basic demo application to demonstrate this.
Target Application
The target application has a simple screen with a drop down list, a button, and a data grid that displays the selected account information. The drop down list is populated with accounts for the logged on user only. I will show how the data can be modified to view another account that we were not granted access to. It is important to note that there are many variables to requests and this assumes that authorization was only checked to fill the drop down list and not when an actual account is selected. This is a pretty common practice because it is assumed that event validation will only allow the authorized drop down items (the accounts in this instance) to be selected by the user. Not all applications are written in this way, and the goal is to test to see if there is authorization or parameter tampering issues.
Tools
I will use multiple tools to perform this test. These tools are personal choice and other tools could be used. The first, and my favorite, is Burp Suite Pro. This will be my main proxy, but that is just because I like how it works better than some others. Secondly, I will be using Fiddler and the ViewState Viewer plug-in to manipulate the View State field. Finally, I have a custom application that I wrote to generate the Event Validation codes that I need to make this work.
The Process
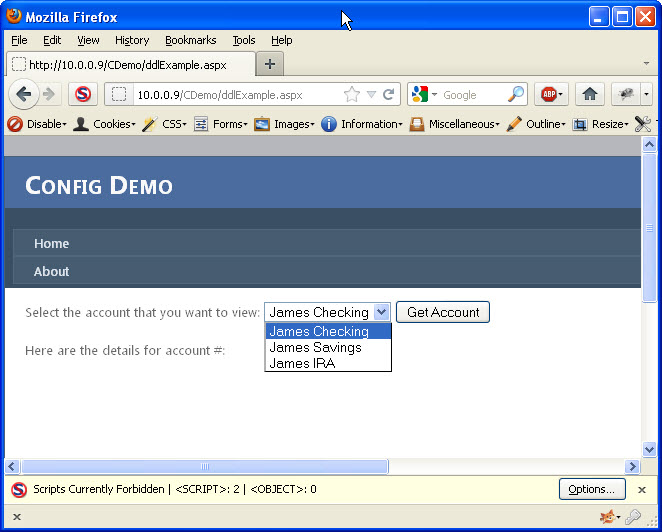
First, I will just load the application and view the target page. Image 1 shows the initial screen with the values from the drop down list. Notice that only 3 accounts are available and they are all for James. By looking at the source for the drop down list, I can see that the values for each of those items are numeric. This is a good sign, for testing purposes. Numeric values are usually easier at determining, especially if you can find a simple pattern.
Image 1
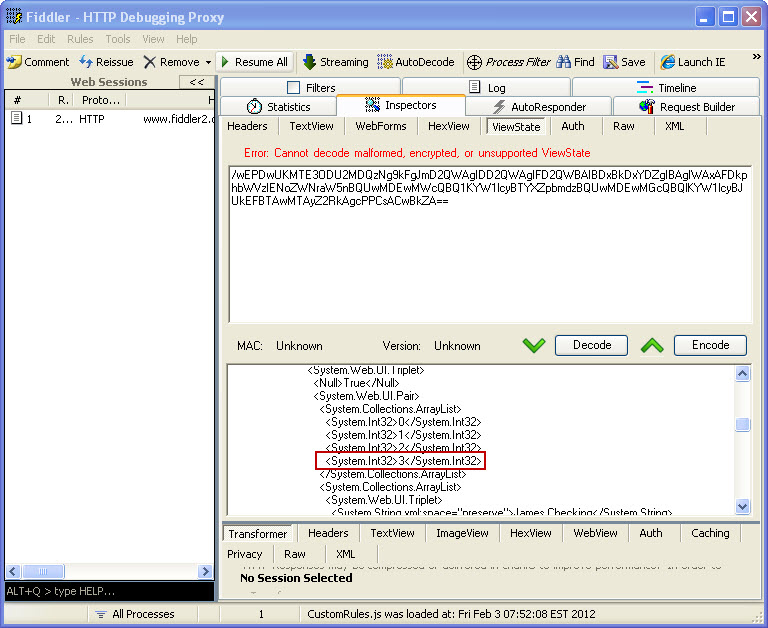
Next, it is time to de-serialize the view state so we can modify it for the value we want to add. To do this, I will use Fiddler and the ViewState Viewer plug-in. There are two changes I need to make. First, I need to add an item to the ArrayList (seen in Image 2).
Image 2
Second, I need to add the drop down list item I want to try and access. The text will not matter, but the value that I add is the key. Although this may not always be the case, in this simple example, that is what the application uses to query the account data. The value needed could be known, or you could just attempt to try different values until you find one that works. The added item can be seen here in Image 3.
Image 3

Now that my view state has modified, I can press the “Encode” button and get the updated view state. Here is the original and modified view state values:
Original __VIEWSTATE
/wEPDwUKMTE3ODU2MDQzNg9kFgJmD2QWAgIDD2QWAgIFD2QWBAIBDxBkDxYDZg
IBAgIWAxAFDkphbWVzIENoZWNraW5nBQUwMDEwMWcQBQ1KYW1lcyBTYXZpbmdz
BQUwMDEwMGcQBQlKYW1lcyBJUkEFBTAwMTAyZ2RkAgcPPCsACwBkZA==
Modified __VIEWSTATE
/wEPDwUKMTE3ODU2MDQzNg9kFgJmD2QWAgIDD2QWAgIFD2QWBAIBDxBkDxYEZg
IBAgICAxYEEAUOSmFtZXMgQ2hlY2tpbmcFBTAwMTAxZxAFDUphbWVzIFNhdmluZ3M
FBTAwMTAwZxAFCUphbWVzIElSQQUFMDAxMDJnEAUOSGFja2VkIEFjY291bnQFBTA
wMjAxZ2RkAgcPPCsACwBkZA==
The next step is to modify the Event Validation value. There are two options to modify this value:
- Use Fiddler and the ViewState Viewer (just like how we just modified the view state)
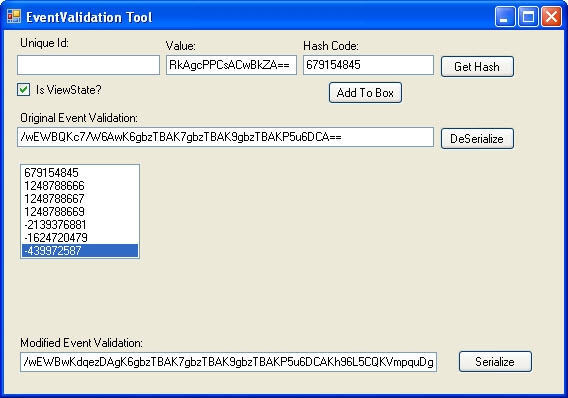
- Use my custom application. This is the method I will use for this example. See Image 4 for a reference to the application.
I will retrieve the __EVENTVALIDATION value from the response and paste it into the Original Event Validation textbox and “De-Serialize” it. This will populate the list box with all of the original hash values. To add custom data, we must use the same technique that the ASP.Net uses to calculate the hash value for the items. There are two values we need to modify in this example.
- First, I need to modify our allowed viewstate hash. To do this, I will put my modified __VIEWSTATE value into the “Value” textbox and click the “Get Hash” button. View State is a little different than other control data in that it does not require a Unique Id to be associated with it to generate the hash. The hash value generated is 679154845. This value must be placed in the first array item in event validation.
- Second, I need to add my own drop down item. Previously, I added this to the view state and used a value of 00201. Adding it to event validation is a little different. I will enter in the value (00201) into the “Value” box, and then enter the drop down lists unique id (ctl00$MainContent$ddlAccounts) into the “Unique Id:” textbox. Clicking the “Get hash” button produces the following hash: 439972587. I then add this hash value to the array.
Now that my two hashes have been added, it is time to serialize the data back into the __EVENTVALIDATION value. Here are the two different values we worked with:
Original __EVENTVALIDATION
/wEWBQKc7/W6AwK6gbzTBAK7gbzTBAK9gbzTBAKP5u6DCA==
Modified __EVENTVALIDATION
/wEWBwKdqezDAgK6gbzTBAK7gbzTBAK9gbzTBAKP5u6DCAKh96L5CQKVmpquDg==
Image 4
Due to the time it can take to perform the above steps, I like to do them without holding up my request. Now that I have the values I need, I will refresh my page with my proxy set to intercept the response. I will then modify the response and change the __VIEWSTATE and __EVENTVALIDATION values to my new modified ones. I will let the response continue to allow my page to display.
At this point, nothing appears to have happened. There is no additional drop down list item or anything else to indicate that this has worked. The key is to now just select an existing account and hit the “Get Account” button. If there is an error, something didn’t work right. If you were successful, the page should re-load and you should see a new Drop down List item (See Image 5)
Image 5
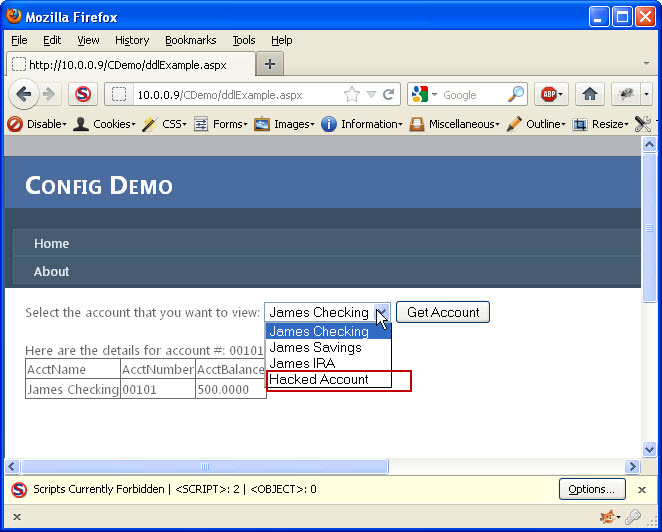
I now need to determine if I was lucky enough to pick a valid account number. I will select the “Hacked Account” list item (which is the one I added) and click the “Get Account” button. If no data comes back then the account number did not exist. It is back to the drawing board to try again with a different number. If, however, account details did show up, then I have successfully accessed data I was not given access to. Image 6 shows the results of a successful attempt.
Image 6

Conclusion
This showed the steps necessary to manipulate both view state and event validation to tamper with the allowed accounts were were authorized to see. This requires that ViewStateMAC is disabled and that the view state has not been encrypted. If either of those two factors were different, this would not be possible. This demonstrates the importance of ensuring that you use ViewStateMAC to protect your view state AND event validation. You should also be performing authorization checks on each request that requests sensitive information from your application. This example application is completely fictional and there are no claims that this represents the way that any production application actually works. It will be used to demonstrate the different techniques used to develop applications to understand how they can be fixed.
This information is provided as-is and is for educational purposes only. There is no claim to the accuracy of this data. Use this information at your own risk. Jardine Software is not responsible for how this data is used by other parties.
Comments
Follow Us