
XSS in Script Tag
Filed under: Development, Security, Testing
Cross-site scripting is a pretty common vulnerability, even with many of the new advances in UI frameworks. One of the first things we mention when discussing the vulnerability is to understand the context. Is it HTML, Attribute, JavaScript, etc.? This understanding helps us better understand the types of characters that can be used to expose the vulnerability.
In this post, I want to take a quick look at placing data within a <script> tag. In particular, I want to look at how embedded <script> tags are processed. Let’s use a simple web page as our example.
<html>
	<head>
	</head>
	<body>
	<script>
		var x = "<a href=test.html>test</a>";
	</script>
	</body>
</html>
The above example works as we expect. When you load the page, nothing is displayed. The link tag embedded in the variable is rated as a string, not parsed as a link tag. What happens, though, when we embed a <script> tag?
<html>
	<head>
	</head>
	<body>
	<script>
		var x = "<script>alert(9)</script>";
	</script>
	</body>
</html>
In the above snippet, actually nothing happens on the screen. Meaning that the alert box does not actually trigger. This often misleads people into thinking the code is not vulnerable to cross-site scripting. if the link tag is not processed, why would the script tag be. In many situations, the understanding is that we need to break out of the (“) delimiter to start writing our own JavaScript commands. For example, if I submitted a payload of (test”;alert(9);t = “). This type of payload would break out of the x variable and add new JavaScript commands. Of course, this doesn’t work if the (“) character is properly encoded to not allow breaking out.
Going back to our previous example, we may have overlooked something very simple. It wasn’t that the script wasn’t executing because it wasn’t being parsed. Instead, it wasn’t executing because our JavaScript was bad. Our issue was that we were attempting to open a <script> within a <script>. What if we modify our value to the following:
<html>
	<head>
	</head>
	<body>
	<script>
		var x = "</script><script>alert(9)</script>";
	</script>
	</body>
</html>
In the above code, we are first closing out the original <script> tag and then we are starting a new one. This removes the embedded nuance and when the page is loaded, the alert box will appear.
This technique works in many places where a user can control the text returned within the <script> element. Of course, the important remediation step is to make sure that data is properly encoded when returned to the browser. By default, Content Security Policy may not be an immediate solution since this situation would indicate that inline scripts are allowed. However, if you are limiting the use of inline scripts to ones with a registered nonce would help prevent this technique. This reference shows setting the nonce (https://developer.mozilla.org/en-US/docs/Web/HTTP/Headers/Content-Security-Policy/script-src).
When testing our applications, it is important to focus on the lack of output encoding and less on the ability to fully exploit a situation. Our secure coding standards should identify the types of encoding that should be applied to outputs. If the encodings are not properly implemented then we are citing a violation of our standards.
Handling Request Validation Exceptions
Filed under: Development
I write a lot about the request validation feature built into .Net because I believe it serves a great purpose to help reduce the attack surface of a web application. Although it is possible to bypass it in certain situations, and it is very limited to HTML context cross site scripting attacks, it does provide some built in protection. Previously, I wrote about how request validation works and what it is ultimately looking for. Today I am going to focus on some different ways that request validation exceptions can be handled.
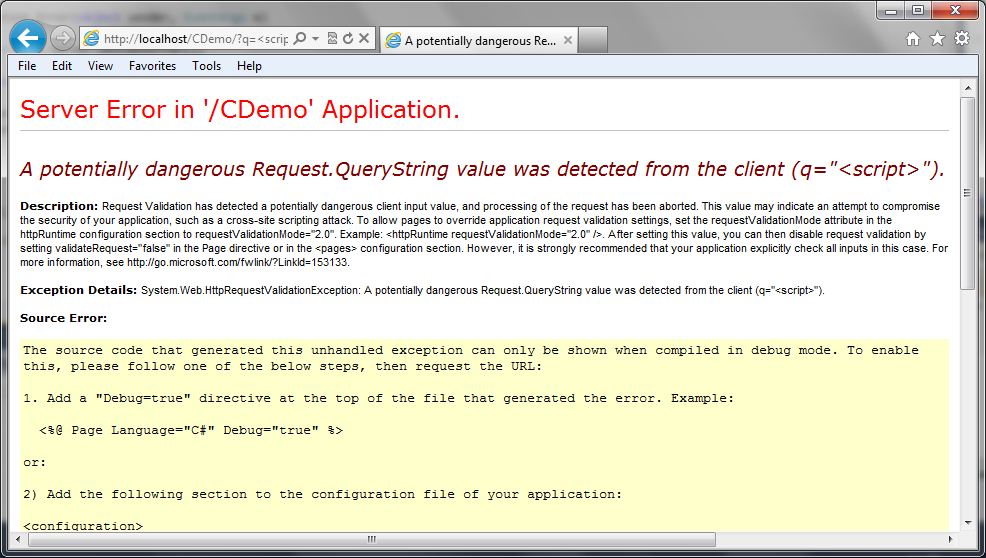
No Error Handling
How many times have you seen the “Potentially Dangerous Input” error message on an ASP.Net application? This is a sure sign to the user that the application has request validation enabled, but that the developers have not taken care to provide friendly error messages. Custom Errors, which is enabled by default, should even hide this message. So if you are seeing this, there is a good chance there are other configuration issues with the site. The following image shows a screen capture of this error message:
This is obviously not the first choice in how we want to handle this exception. For one, it gives out a lot of information about our application and it also provides a bad user experience. Users want to have error messages (no one really wants error messages) that match the look and feel of the application.
Custom Errors
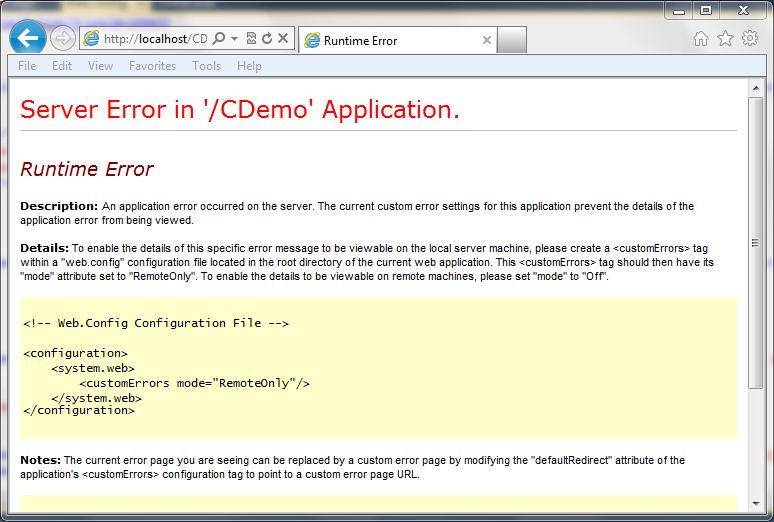
ASP.Net has a feature called “Custom Errors” which is the final catch in the framework for exceptions within an ASP.Net application. If the developer hasn’t handled the exception at all, custom errors picks it up (that is, if it is enabled (default)). Just enabling customer errors is a good idea. If we just set the mode to “On” we get a less informative error message, but it still doesn’t look like the rest of the site.
The following code snippet shows what the configuration looks like in the web.config file:
<system.web>
<customErrors mode="On" />
The following screen shot shows how this looks:
Custom Errors with Redirect
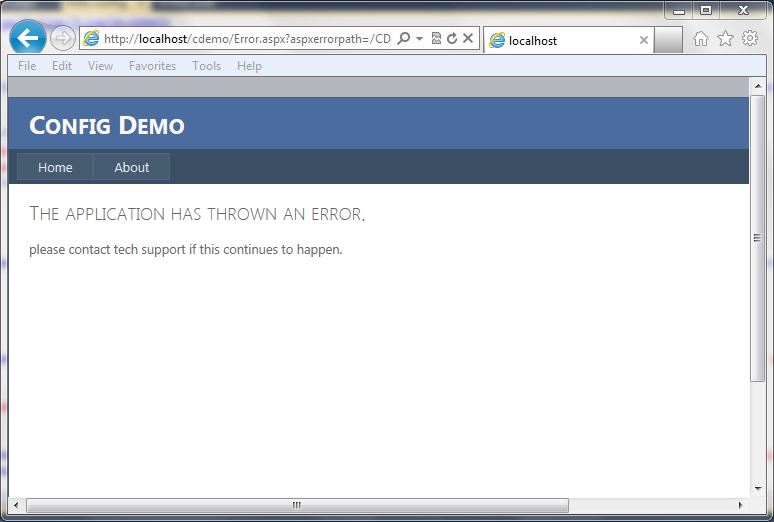
Just turning customer errors on is helpful, but it is also possible to redirect to a generic error page. This allows the errors to go to a page that contains a generic error message and can look similar to how the rest of the site looks. The following code snippet shows what the configuration looks like in the web.config file:
<system.web>
<customErrors mode="On" defaultRedirect="Error.aspx" />
The screen below shows a generic error page:
Custom Error Handling
If you want to get really specific with handling the exception, you can add some code to the global.asax file for the application error event. This allows determing the type of exception, in this case the HTTPRequestValidationException, and redirecting to a more specific error page. The code below shows a simple way to redirect to a custom error page:
void Application_Error(object sender, EventArgs e)
{
Exception ex = Server.GetLastError();
if (ex is HttpRequestValidationException)
{
Server.ClearError();
Response.Redirect("RequestValidationError.aspx", false);
}
}
Once implemented, the user will get the following screen (again, this is a custom screen for this application, you can build it however you like):

As you can see, there are many ways that we can handle this exception, and probably a few more. This is just an example of some different ways that developers can help make a better user experience. The final example screen where it lists out the characters that are triggering the exception to occur could be considered too much information, but this information is already available on the internet and previous posts. It may not be very helpful to most users in the format I have displayed it in, so make sure that the messages you provide to the users are in consideration of their understanding of technology. In most cases, just a generic error message is acceptable, but in some cases, you may want to provide some specific feedback to your users that certain data is not acceptable. For example, the error message could just state that the application does not accept html characters. At the very least, have custom errors enabled with a default error page set so that overly verbose, ugly messages are not displayed back to the user.
ASP.Net 4: Change the Default Encoder
Filed under: Development, Security
In ASP.Net 4.0, Microsoft added the ability to override the default encoder. This is specifically focused on the HTMLEncode, HTMLAttributeEncode, and URLEncode functionality. These functions are used, in the eyes of security, to help mitigate cross-site scripting (XSS). The problem with the built in .Net routines is that they are built on a black-list methodology, rather than a white-list methodology. The built in routines use a very small list of characters that get encoded. For example, the .Net version of HTMLEncode encodes the following characters: <,>,â€,&. The Microsoft Web Protection Library (previously known as the Anti-XSS Library) instead determines all characters that don’t need encoding, a-z0-9 for example, and then encodes all the rest. This is a much safer approach to encoding.
In this post, I will show you how to use the Web Protection Library as the default encoder for an ASP.Net 4.0 application. The first step is to download the Web Protection Library. In this example, I use version 4.0 which can be found at: http://wpl.codeplex.com/.
Next, you will need to have an application to implement this. You can use an existing application, or create a new one. Add a reference to the AntiXSSLibrary.dll found in†Program Files\Microsoft Information Security\AntiXSS Library v4.0â€.
To use the library, it is time to create a new class. You can see the code in my class in Figure 1. I named the class “MyEncoder†and this is just a sample. (THIS IS NOT PRODUCTION CODE) There are two important factors to this class:
1. The class must inherit from System.Web.Util.HttpEncoder.
2. You must override each Encode Method you want to change.
If you only wanted to update the HTMLEncode and leave the other methods alone, just leave them out of the class.
Figure 1
using System;using System.Web;public class MyEncoder : System.Web.Util.HttpEncoder{public MyEncoder(){}protected override void HtmlEncode(string value, System.IO.TextWriter output){if (null == value)return;output.Write(Microsoft.Security.Application.Encoder.HtmlEncode(value));}protected override void HtmlAttributeEncode(string value, System.IO.TextWriter output){if (null == value)return;output.Write(Microsoft.Security.Application.Encoder.HtmlAttributeEncode(value));}}The final step to implementing this custom encoding is to update the web.config file. To do this, modify your httpRuntime element to have the “encoderType†attribute set, as seen in Figure 2. Change “MyEncoder†to the name of the class you created. If you do not have the httpRuntime element, just add it in.
Figure 2
<system.web><compilation debug="true" targetFramework="4.0"/><httpRuntime encoderType="MyEncoder"/>.....Although it would be really nice if the .Net Framework would just start using the Web Protection Library, they are just not ready for that yet. It is important that plenty of testing is always done when working with output encoding. Different encoders produce different outputs and may cause display defects. It is also important to note that this only effects items that get auto-encoded by the framework. For example, a text property of a textbox.
This is just a small example of modifying the default encoding type of your application. There is much more that you could potentially do with this. This is just a sample and this code is NOT FOR PRODUCTION USE.
Follow Us